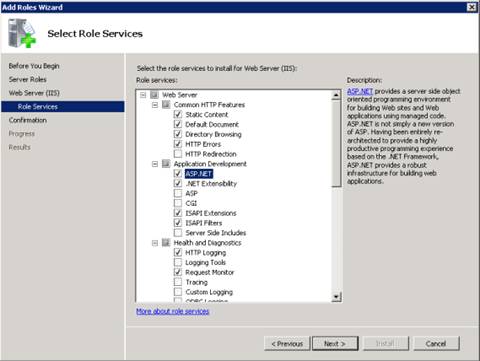
Connect can be deployed on IIS in 2 modes:
A. When IDENTITY is ApplicationPoolIdentity
Verify .Net Framework 4.0 is installed on the Machine. (Currently CONNECT is
compatible with Framework 4.0)
Note: If .Net Framework 4.5 is installed on a machine, changes are required in compiled code.
Install IIS with the following components on the machine:
a. Web Management Tools
b. IIS 6 Management Capabilities
c. IIS Management Console
d. IIS Management Scripts and Tools
e. IIS Management Services
f. .Net Extensibility X.X
g. ASP.NET X.X
h. Common HTTP Features and Sub options
i. HTTP logging
Install Open Office (3.4.1?)
Install ABCPDF version 9.1
Install ReferralNet Agent current version available on the website (Service Mode).
Copy Site folder in INETPUB
In IIS Create a new site: Specify Port 8080
In IIS go to Application Pool and in Advance Settings update the following:
General (.NET Framework Version) – 4.0
General (Enable 32 bit) – True
Process Model (Identity) – ApplicationPoolIdentity
Process Mode (Load User Profile) – True
Rapid Fail Protection (Enabled) – False
Go to website folder, open Properties, select Security and add IIS_USER with R/W permission
Open Web.Config and update the following:
specify the correct support Email ID as required in
Specify the correct value for key="SitePath"
Specify the correct ReferralNetAgent.exe path for key="ReferralNetAgentPath"
Verify the ReferralNet web service endPoints
Open ConnectionStrings.config and specify the Data Source and database name for MasterCareEMR
Open Settings.txt (Location -- \\inetpub\CONNECT\App_Data\Sites\Default) and
Specify Data Source & database name for connect (MCEMRBPPDB)
Start the website.
B. When IDENTITY is a Custom Account
Custom Set Up - Using “Custom Account” rather than “Built-in Account” as
PROCESS MODEL (IDENTITY) [SET UP recommended under GLOBAL HEALTH IT POLICY ]
Verify .Net Framework 4.0 is installed on the Machine. (Currently CONNECT is
compatible with Framework 4.0)
Note: If .Net Framework 4.5 is installed on a machine, changes are required in compiled code.
Install IIS with the following components on the machine:
a. Web Management Tools
b. IIS 6 Management Capabilities
c. IIS Management Console
d. IIS Management Scripts and Tools
e. IIS Management Services
f. .Net Extensibility X.X
g. ASP.NET X.X
h. Common HTTP Features and Sub options
i. HTTP logging
Install Open Office
Install ABCPDF version 9.1
Install ReferralNet Agent current version available on the website (Service Mode).
Create a new Local User Account on the machine as MCEMRWorker
Give it a STRONG password
Check option “User cannot change password” and “Password never expires”
Remove it from the Users Group and add it to IIS_USERS group (verify if group name is changed)
Create a new Local User Account on the machine as MCEMRGuest
Give it a STRONG password
Check option “User cannot change password” and “Password never expires”
Remove it from the Users Group
Copy Site folder in INETPUB
Add following permission to site folder:
SYSTEM, NETWORK SERVICE and ADMINISTRATORS have full access
MCEMRWorker has modify access
MCEMRGuest has Read and Execute access
Remove all other permissions
In IIS Create a new site: Specify Port e.g. 8080
In IIS go to Application Pool and in Advance Settings update the following:
General (.NET Framework Version) – 4.0
General (Enable 32 bit) – True
Process Model (Identity) – MCEMRWorker
Anonymous Authentication to MCEMRGuest
Process Mode (Load User Profile) – True
Rapid Fail Protection (Enabled) – False
In SQL Server setup user for MCEMRWorker and set as DB Owner for both databases MasterCareEMR and MCEMRBPPDB
Go to website folder Properties à Security and add MCEMRWorker with Read/Write/Modify/Execute permission
Go to website folder open Properties, select Security and add MCEMRGuest with Read/Execute permission
Note: Repeat step 13 and 14 for ReferralNet Agent installation folder and in \\ProgramData\ReferralNet-Agent
Open Web.Config and update the following
specify the correct support Email ID as required in
Specify the correct value for key="SitePath"
Specify the correct ReferralNetAgent.exe path for key="ReferralNetAgentPath"
Verify the ReferralNet web service endPoints
Open ConnectionStrings.config and specify the Data Source and database name for MasterCareEMR.
Open Settings.txt (Location -- \\inetpub\CONNECT\App_Data\Sites\Default) and Specify
Data Source & database name for connect (MCEMRBPPDB)
Start the website.
Note:
- Verify ReferralNet web services endpoint in web config and update it based on environment either Production or Staging.
- Install MastercareEMR Admin Client.
- The Mastercare EMR database to which connect is linked has some connect specific columns.
Update EMR DB using the attached script.
3. Specify PDF saved path in EMR database organisation table for field PDFSavedPath. This path is \\inetpub\wwwwroot\MCEMRBPP.deploy\Temp\.
Note: R/W privileges must be specified for defaultapppool on this folder
4. Update MasterCareEMR database Organisation table PDFSavedPath field. Specify the temp path of deployed package.
e.g. \\inetpub\wwwroot\Orchard.Web_deploy\Temp\
5. Specify ReferralNet account details in Team used to access connect.
For Reference:

IIS v 8.0.9200 Win 8 with .Net Framework 4.5 Installed

IIS v 7 in Win Server 2008 R2


No comments:
Post a Comment